
Securing Flutter Apps with .env: A Comprehensive Guide #2
3 min readBy Aerotix

In Flutter development, managing environment-specific configurations like API keys, base URLs, and other sensitive data is crucial. The flutter_config package combined with .env files provides a robust solution for securely managing these configurations. This article will walk you through the process of setting up flutter_config and .env files in your Flutter project to enhance security and simplify environment management.
Flutter Setup:
1- Setting Up flutter_config in Your Flutter Project:-
To get started, add the flutter_config package to your pubspec.yaml file:
dependencies:
  flutter_config: ^2.0.2
Run flutter pub get to install the package.
2- Create the .env File:-
In the root of your Flutter project, create a .env file. This file will store your environment variables:
API_URL=https://api.yourservice.com
API_KEY=your-api-key
Ensure that your .env file is added to .gitignore to prevent it from being committed to version control.
3- Load Environment Variables:-
To load the environment variables from your .env file, initialize flutter_config in your main application file:
import 'package:flutter/material.dart';
import 'package:flutter_config/flutter_config.dart';

void main() async {
  WidgetsFlutterBinding.ensureInitialized();
  await FlutterConfig.loadEnvVariables();
  runApp(MyApp());
}
4- Access Environment Variables:-
String apiUrl = FlutterConfig.get('API_URL');
String apiKey = FlutterConfig.get('API_KEY');
Android Setup:
1- Apply Plugin in Gradle:-
Open your android/app/build.gradle file and add below the plugins.
apply from: project(':flutter_config').projectDir.getPath() + "/dotenv.gradle"

project.ext.envConfigFiles = [
        developdebug     : ".env",
        developrelease   : ".env",
        stagingdebug     : ".env",
        stagingrelease   : ".env",
        productiondebug  : ".env",
        productionrelease: ".env",
]
If you are using different environments you will edit on envConfigFiles as your .env environments files
2- Building a Release Version:-
When building your APK for release, the R8 code shrinker may obfuscate the BuildConfig class, which holds all environment variables, causing them to be null.
Solution:
Add a proguard-rules.pro file in your android/app directory.
Add the following line to the proguard-rules.pro file
-keep class com.yourcompany.app.BuildConfig { *; }Replace com.yourcompany.app with your app’s actual package name.
3- Usage in Gradle & XML Files:-
You can access environment variables in your Gradle configuration:
defaultConfig {
    applicationId project.env.get("APP_ID")
}
Use environment variables to configure libraries in AndroidManifest.xml and other XML files:
<meta-data
  android:name="com.google.android.geo.API_KEY"
  android:value="@string/GOOGLE_MAPS_API_KEY" />
4- Handling Different Environments:-
Save configurations for different environments in separate files such as .env.staging, .env.production, etc.
You can build releases with different configurations by specifying the appropriate environment file:
$ cd android && ENVFILE=.env.staging ./gradlew assembleReleaseAlternatively, define a map in build.gradle associating builds with .env files. Do this before the apply from call, using lowercase for build cases:
project.ext.envConfigFiles = [
    debug: ".env.development",
    release: ".env.production",
    anothercustombuild: ".env",
]

apply from: project(':flutter_config').projectDir.getPath() + "/dotenv.gradle"
iOS Setup:
1- Accessing in Build Settings:-
Navigate to Runner > Flutter.
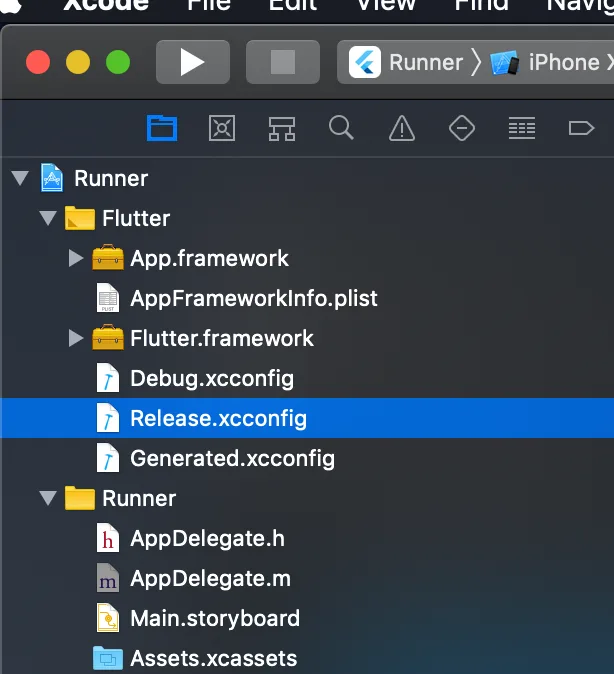
You must add the following line to both Debug.xcconfig and Release.xcconfig:
#include? "tmp.xcconfig"It’s also advisable to include this file in your .gitignore:
**/ios/Flutter/tmp.xcconfig2- Edit in Build Schema:-
In Xcode, go to Product > Scheme > Edit Scheme:
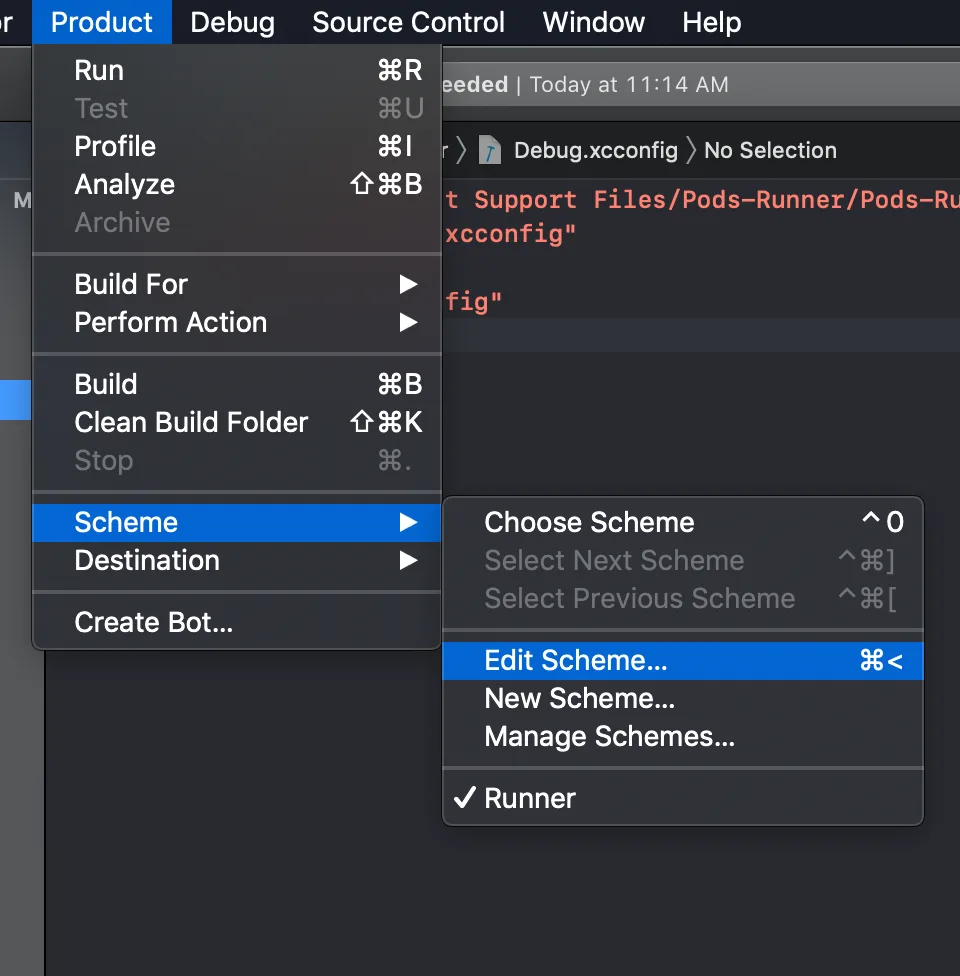
Under Build > Pre-actions, add two new run script actions with the following code:
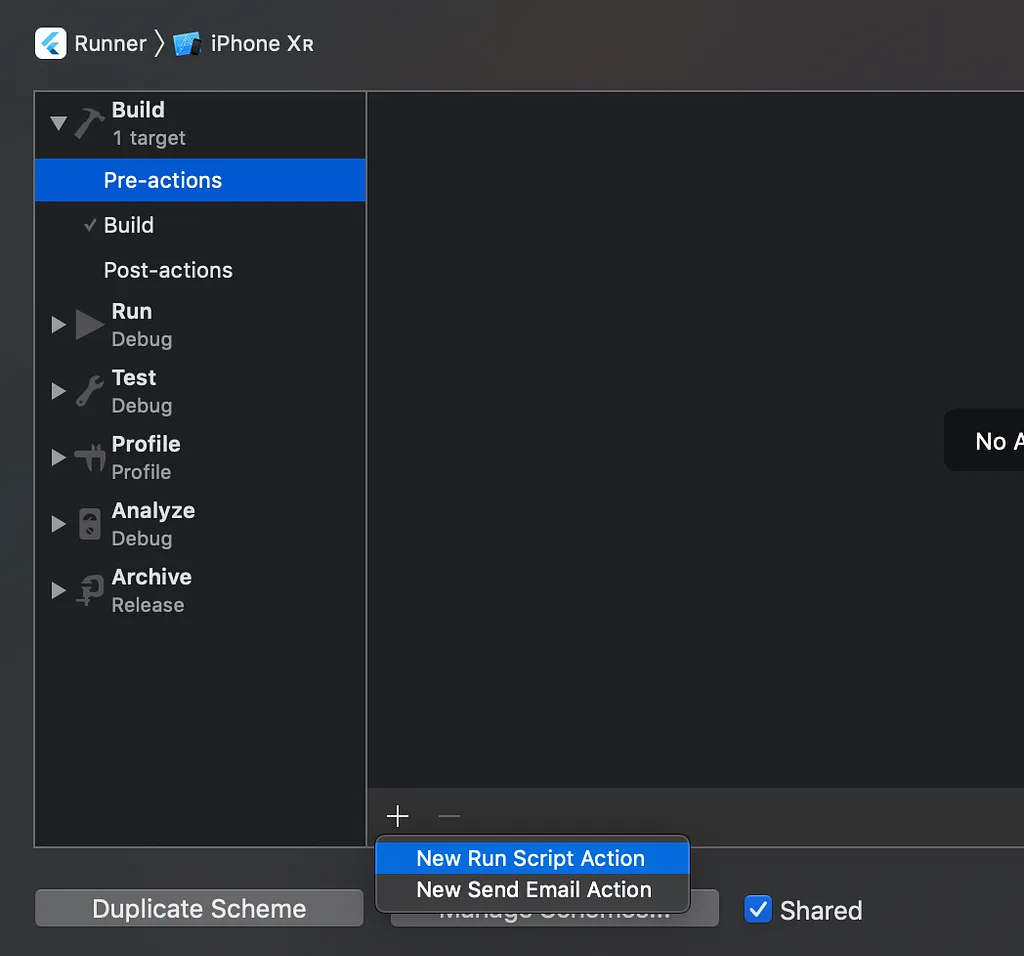
echo ".env" > ${SRCROOT}/.envfile${SRCROOT}/.symlinks/plugins/flutter_config/ios/Classes/BuildXCConfig.rb ${SRCROOT}/ ${SRCROOT}/Flutter/tmp.xcconfigEnsure that you select Runner from the Provide build settings from dropdown.
Your final scripts should resemble the following:
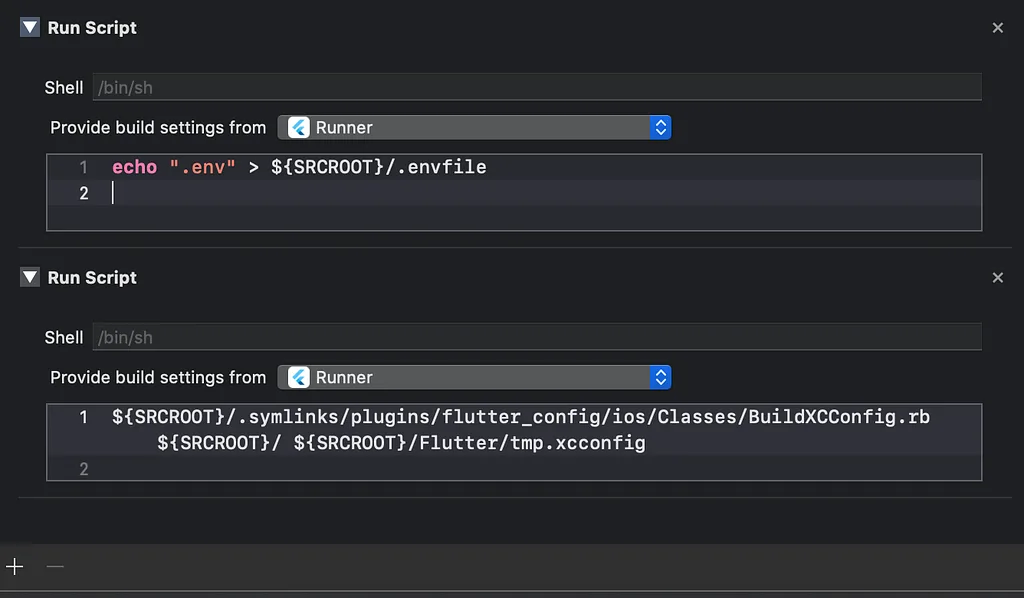
Generally, you only need to do this for the runner scheme if you have a single environment.
This process will create a tmp.xcconfig file that can be accessed by Info.plist.
3- Handling Different Environments:-
The fundamental approach in iOS is to create one scheme for each environment file, allowing you to switch between them effortlessly.
To create a new scheme:
In Xcode, go to Product > Scheme > Edit Scheme.
Click Duplicate Scheme at the bottom.
Provide a suitable name in the top left corner, such as “Myapp (staging).”
NOTE
Ensure that your scheme name corresponds to the flavor name defined on the Flutter side, e.g., flutter run ios — flavor develop.
Next, edit the newly created scheme to utilize a different environment file. From the same “Manage Scheme” window:
In Xcode, go to Product > Scheme > Manage Schemes, select your scheme, and click Edit.
Repeat steps 3 and 4 for each scheme, replacing the environment files as needed:
echo ".env.staging" > ${SRCROOT}/.envfile # substitute .env.staging with your specific fileThis process is still somewhat experimental and may not be perfect — feel free to share your ideas for improving iOS configurations by opening a pull request or filing an issue!
Conclusion:-
Using Flutter Config with .env files streamlines environment variable management, enhancing security by keeping sensitive data separate from the codebase. This implementation allows for easy configuration management across different environments, promoting best practices and improving maintainability. Overall, it provides a secure and efficient way to manage application settings in Flutter projects.